You should only let spontaneity and improvisation guide you when everything you need for the shot is already in your head!"
There are basically two existing and extremely different ways of animating: "Straight Ahead" and "Pose-To-Pose". Both workflows are well-established in the industry and have been greatly improved since their first definition by the nine old men from Disney in around 1940. Still, no-one uses either one or the other, but instead creates a useful combination of both to best fit his own workflow.
I will start by explaining both of them separately, in detail, and then talk about how you can combine both workflows in order to get the maximum out of your actions and achieve
physical correctness (Fig.01).

This is generally a very intuitive and fluid way to animate. Here you don't actually plan your shot from beginning to end with key poses, breakdowns or anticipations. Instead, you more or less start with the first frame and work your way "straight ahead", from one key to the breakdown and over to the next key pose, until you reach the end of your shot.
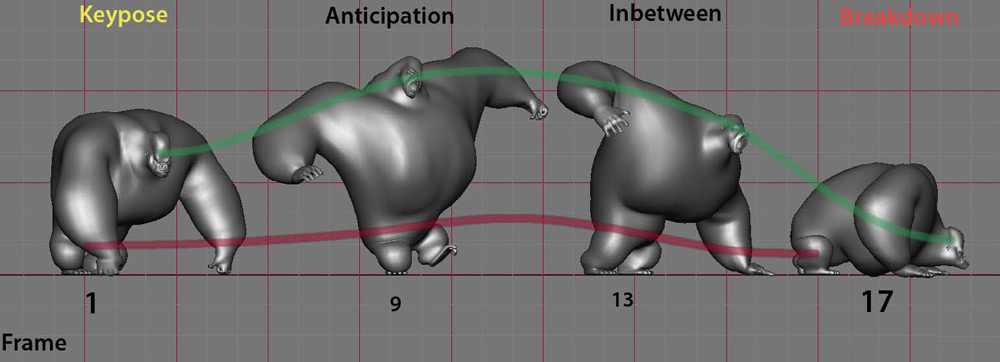
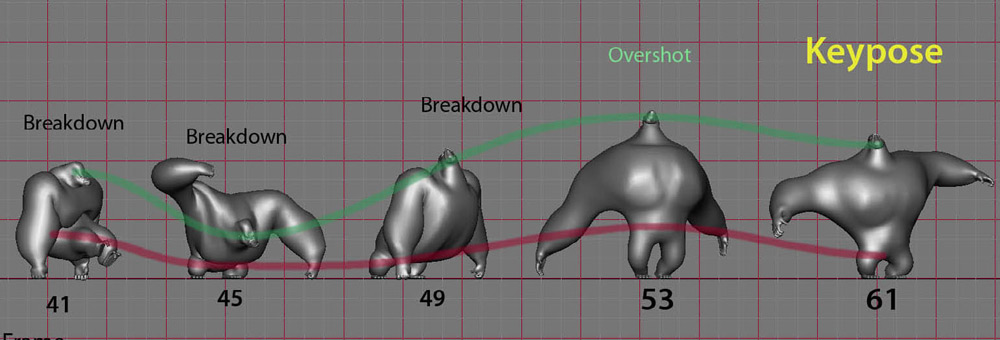
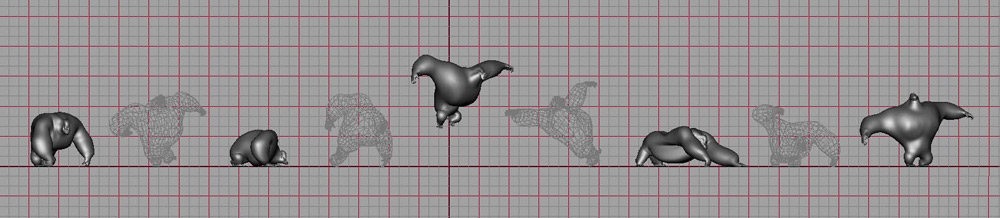
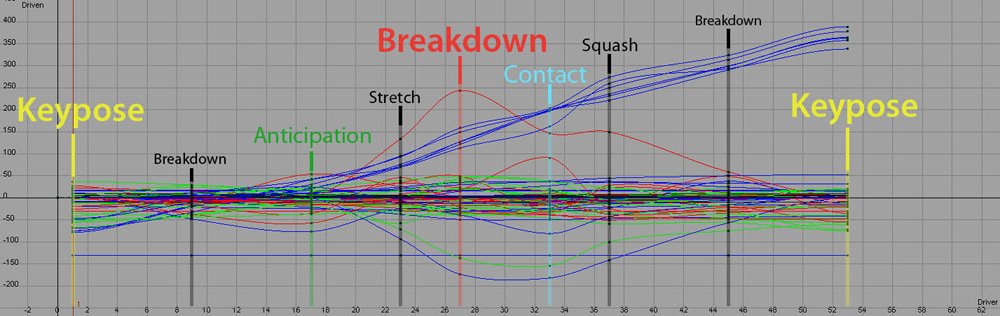
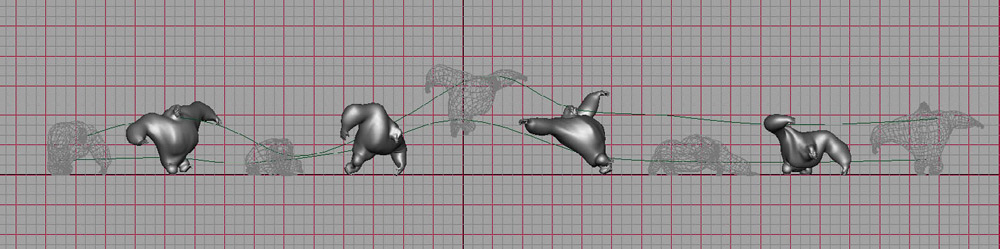
Fig.02, Fig.03, Fig.04 and Fig.05 clearly show this "straight ahead" process; how you can go from the "Keypose", over an "Anticipation", and into a squashing "Breakdown". After a "Push Off" pose and a "Stretch" you can go into the extreme jump pose. A contact pose leads into a squash, and over several breakdowns you arrive at the final keypose.
With this process, it's your spontaneity and improvisation as you go along that can lead to a very original and entertaining shot. You can achieve a natural flow and produce an animation that integrates itself into the flow of the story - by which I mean that the timing and rhythm of the animation matches the story-rhythm, rather than standing as itself as an animated movement.

But be careful: you should only let spontaneity and improvisation guide you when everything you need for the shot is already in your head! For example, when animating a neutral walk cycle with a heavy creature you should already know that one step will not be between 8 to 12 frames, but rather between 16 and 32 frames. And when, for example, you're animating a small and nervous character, a surprised reaction can already look convincing in just four frames! Let your intuition and feeling guide you to a good, rhythmic pattern of poses and to original acting ideas, with the important guidelines of the overall story in mind. Great originality, natural rhythm and entertaining timing, with the most life and dynamic, come from this way of working.
So "straight ahead" means you don't block out your shot, but that you go from one pose to the next in a detailed manner. As easy-going as it may sound, there are also a few traps that you should be aware of. There is no way to create an animatic by using the "straight ahead" method (a rough 3D version of the movie, where every shot has just the characters moving in 3-4 keys to indicate what happens). Because of this, it is impossible to structure a story and work out its dramatic build-up! Also, you have no early results to discuss with the director and you have less opportunity to try different versions of the same shot. This means less research and development to find the best solution. One can quickly start to lose connection with the overall structure of the shot. By getting caught up in detailed overlapping or weight too soon, you give away control over the whole
structure of the shot and its integration into the story's sequence. Therefore the buildup of entertainment, or the development of a character, doesn't progress or enhance the shot - which is the most important thing in every shot. Entertainment and progress bring development, and therefore reason, to your animation.

You can easily miss important turns in the story; climaxes where a particular thing has to happen (e.g. minimal/broad acting); a certain movement or emotion; the essence of a joke or even a stiff hold. As a result, the director is likely to feel a big loss of influence over his shot and the whole sequence. It's also quite easy to end up with a lot of necessary cleanup work in the curves, with many untidy intersections between the character's limbs or his environment, which will show up in the lighting process before rendering.
"Straight ahead" animation is clearly the more advanced technique of the two, but basically requires that all your references and your tools are already in your head. Dramatic structure, natural locomotion and weight (Timing), human and animal-psychology (Acting) and composition should flow, as well as the necessary software tools.
This process generally means working from the "outside to the inside" of a shot. First of all, you only create key poses where you want a story-beat, or where you want an xtreme
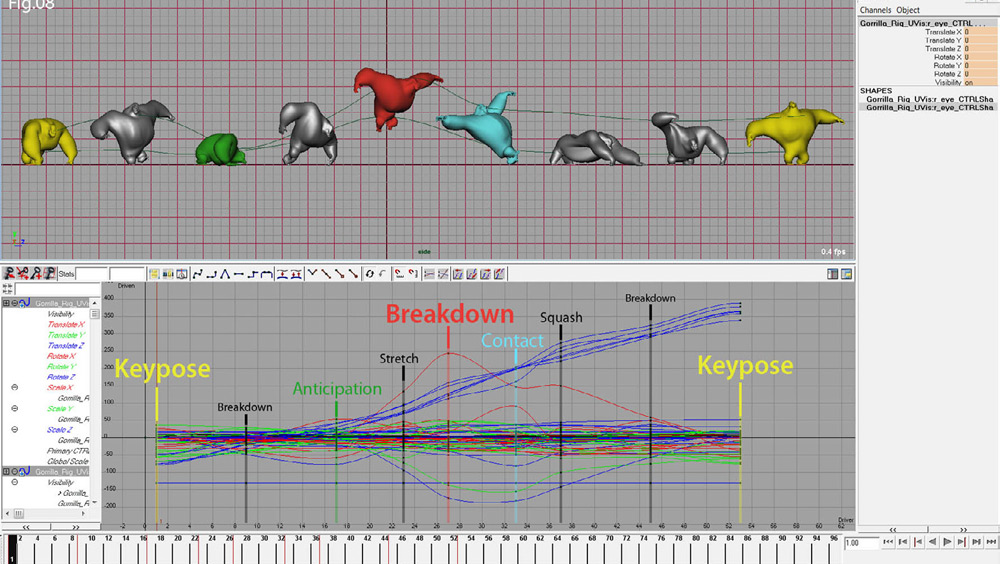
pose (Fig.06). Second, you take care of the breakdowns, contacts and anticipations (Fig.07a and Fig.07b). And last but not least, you look at the "in-betweens" (Fig.08).
You concentrate most on the key poses and spend much more time refining them, working out a good line-of-action, finding balance or off-balance, searching for a good ilhouette, and playing with the strong shapes of the character design. After that you can concentrate on the basic timing and rhythm of the shot, with only a few of these main key poses. This makes it really quick and intuitive, and also keeps the shot simple and clear.
And voila - there you have an animatic! That's why, at this stage in a real production, it pays to work in a "pose-to-pose" style. You can create lots of different block-versions of a shot and therefore find the most entertaining and interesting solution. You also have a basis for first discussions with the director! This way you can deal with the creative problems, but also with technical problems (for example, intersections in the character or between him and his environment).
Productions are getting more and more complex all the time; meaning that cloth, simulated muscle-deformation, hair and fur are intensively used with characters and creatures nowadays. This also brings many restrictions and traps to be aware of, from the earliest stage. So working "pose-to-pose", you actually have the control to make sure the cloth has enough space to work properly. The hand is not inside the hair, a leg doesn't stick into the character's belly, and so on and so forth. So thinking about how and where shadows fall can also save you a lot of trouble in a 3D set when it comes to fixing animation for the pipeline.
While control is the big pro when it comes to "pose-to-pose", it can also be a big disadvantage! Unlike with the "straight ahead" method, you have to add many poses afterwards, or adjust timings between body parts here and there to get an interesting flow into the shot, plus realistic movement. Going from pose to pose in an even timing, or in an even movement (arcs plus interesting breakdowns), can look really boring and
Always think in terms of different passes or layers when approaching a shot. You have to switch from a rough "straight ahead" pass to a more controlled "pose-to-pose" pass, and then back to a "straight-ahead" pass, and so on.The first one should be a quick, "straight ahead" blocking pass, in 2-4 main beats (poses) through the whole shot. I say "quick" because you shouldn't care about details, like the fingers or face - just make the idea clear with the body and be generous with frames and space. Don't let restrictions like geometry-intersections or the camera angle restrict your acting ideas. Just think about the character and his goal.
In a regular length of 50-100 frames, I generally stick with 2-4 main poses. This keeps it simple for the audience because they only see the shot for a few seconds and ZIPPP! - the shot is gone! That way you also have time to do more than one version of a shot and explore the character and his design a little.
This not only applies to a single shot or sequence, but also to a complete movie. Always establish the flow, rhythm, and cut of the story as one whole piece before you start to animate. So when you are assigned a sequence of five shots, block all of them out first and control the rhythm of the cut and the action. When you have decided on one acting
idea, and the overall timing and build-up of the shot is established, go in and clean up the poses to make sure they read well and have no intersections.
At this very rough stage I usually work on the facials only for the main key poses. The face is always the most important part of the body, and the eyes are the heart of it, so you should spend at least 40% of your time on the poses and timing of the face. The eyes are where the audience look most in a shot; they always search for them and try to find the character's personality in them. By "eyes" I mean eyeballs, pupils, eyelids and eyebrows.
At this "First Block" stage you have to have an iron clad control over the composition and the rhythm of the shot. Take a step back from the screen regularly and always look at the shot as if you were to see it for the first time. You have to learn to judge it with the eye of someone without any animation experience, who is expecting entertainment of the most interesting and emotional level possible. Try to look at it with the eyes of a child; a simple and pretty straight forward mind, simple logic and most importantly has total honesty and believability!
Now start to go through the shot in several "straight ahead" passes. Always go through it from the beginning to the end. Work on all corners of the shot at the same time; i.e. all poses, breakdowns, in-betweens and anticipations should have the same finishing degree. Still try to get as much from as few keys as possible, and always focus on the timing of the body, arms and legs. This way you polish every corner of the shot with the same degree and no section becomes too detailed, yet. Stick to the timing you established efore
and don't shift or merge poses into movement just because you need more frames for a particular overlap!
The reason to keep the keys clean and not too offset as long as possible, is that you should be able to adjust the major timing for the sake of entertainment until it is approved, because when you are working on a sequence of 3 or 4 shots in a row, you have to work on all the shots at the same time to create the necessary structure of the timing and the storytelling of the whole sequence.
On the one side you should convey your acting in the most simple way, i.e. find the most simple transition between your key poses. Don't work on fancy arcs and overlaps for the sake of animation. But on the other hand it should still be of such a surprise and originality that, no matter how simple the action is (lifting up a book, sitting down on a chair), you find solutions that suit the character, show his personality and simply haven't been used before. Explore and be creative as much as possible within the limits of the character's brief!
In this phase, learn to see in different passes, i.e. see in time (just feel the beats and the overall rhythmical pattern in which the poses happen); for example, fast-fast-fast-slow or slow-fast-fast-slow. Take a song that you like and listen to the patterns in which the drummer hits the drum. Transfer this pattern into a sequence of key poses and BAMM! - you have an interesting rhythm!
See in shapes, i.e. only see the outline/ silhouette, the positive space of the body and the negative space between its limbs, in combination with the environments compositional lines, and BAMM! - you have an interesting composition!
Make as much use of a character-design as possible; i.e. really look at your character and realise when a pose alone can show more than an animation.
First take care of interesting breakdowns between the key poses, that is to combine a good arc, squash and stretch, and change of shape in one single pose = breakdown. When we are at this stage the approach to timing has changed. Before, you established the timing by your feeling and intuition in a very "straight ahead"-like spontaneity. Now you have reached the next level of detail and have to look at the actual frames and their roles. Therefore, I always keep in mind the rule of 2s and 1s from 2D animation: plan in 2s or "regular" frame numbers and you are always able to put at least one pose in-between! That way you take more control over the in-betweens and leave less and less work to the computer. For example, put a key pose on frame 1 and the next key pose on frame 16. Put the breakdown right between them on frame 9. Now you have 8 frames on each side of the breakdown and you can again set a pose right between them. Have a good mix between even frame transitions and uneven frame-transitions, and you will end up with a very realistic result!
Probably the most effective means for creating interesting animation is contrast. It catches the viewer's attention, mind and heart - not just his eye!
Contrast, timing-wise, means slow beats work against fast ones; staccato moves against fluid lines; snappy moves against holds, and so on.
Contrast, composition-wise, means small, colourful and detailed shapes work against big, monochrome simple ones. For example, a detailed, brightly-coloured character silhouette against a simple cloudless sky; a monochrome stylised character design within a highly-detailed and colourful jungle environment, and so on.
Contrast, character-wise, shows the typical features within and the differences between personalities; e.g. a young, nervous and playful kid against a heavy, stoic, serious bank man - big and broad moves against small blinks or facials. Use the contrast between movement and a still pose. Show as many differences as possible in types; i.e. nervous/silent, afraid/ encouraged, female/male, as well as differences between size, weight, age, education, environment, social-status, goals, and priorities in life, until you reach a psychological level.
Contrast, camera-wise, makes as much use of the camera that you are allowed to; i.e. use hand-held style, the right amount of panning or trucking in/out, or even camera shakes when they enhance the impact of the action. Remember that the goal of a shot is to make the audience feel as if they are standing right in it,
and are part of the action. The camera is the eye of the audience and your job is to lead it! Contrast, depth-wise, always shows the depth in the scene by describing the 3-dimensional space; i.e. plan footsteps through the actual 3D environment and work out poses and arcs in the perspective-view.
Daniel Zettl & Robert Kuczera
This tutorial was published on www.3dcreativemag.com